One of the downsides of Linux is that there are not so many games available for it. It’s true that lately a lot of games were ported to Linux, but usually the games are developed almost exclusively for Windows. As a Linux user, in order to play one of those Windows games, you had 3 options:
– try to play it with Wine, but that works usually with older games.
– have a dual-boot setup, and every time when you want to play a game, boot Windows, which is kind of annoying.
– very, very old games (and no 3D games) could be played in a windows virtual machine.
But now, there is a 4th option: use a Windows virtual machine with GPU passthrough. There are some hardware prerequisites and it will work only with specific CPUs and GPUs, but if you have the correct hardware, it is possible.
Notes
I’ve successfully set GPU passthrough on my PC – i5-3570 CPU, Asus P8H77-V LE motherboard, one Radeon R7 250 (for the virtual machine) videocard and one nVidia 750 Ti (for the host) – running openSuSE Leap 42.2 kernel 4.4.36-8-default.
Although I’ll try to make a guide that anyone can follow, I’ll assume that the reader has at least *some* Linux knowledge.
Prerequisites
– you need at least 2 video cards – one will be used by the Linux host and the other one will dedicated to the virtual machine (let’s use VM from now on) that’s running Windows.
– you can’t use a Intel integrated GPU for the VM, you can use only AMD or nVidia. You can use Intel integraded GPU for the host, though.
– you need a CPU and a motherboard that supports VT-D (Intel) or AMD-Vi (AMD) – a list can be found here – and you need to enable it in BIOS .
– the PCI root port should not be part of the same IOMMU group as the GPU you want to use with the VM (more details later).
– a secondary display or free input port on your primary display to be used by the VM.
1. Install software
zypper in libvirt libvirt-client libvirt-daemon virt-manager virt-install virt-viewer qemu qemu-kvm qemu-ovmf-x86_64 qemu-tools
Also, download VirtIO drivers from here.
2. Enable IOMMU
IOMMU is a generic name for Intel VT-x/Intel and AMD AMD-V/AMD-Vi. Enable it by setting intel_iommu=on (for Intel CPUs) or amd_iommu=on (for AMD CPUs) bootloader kernel option. To do this, edit /etc/default/grub and add intel_iommu=on or amd_iommu=on to GRUB_CMDLINE_LINUX_DEFAULT options. Save the file and regenerate grub by executing
grub2-mkconfig -o /boot/grub2/grub.cfg
Reboot and execute
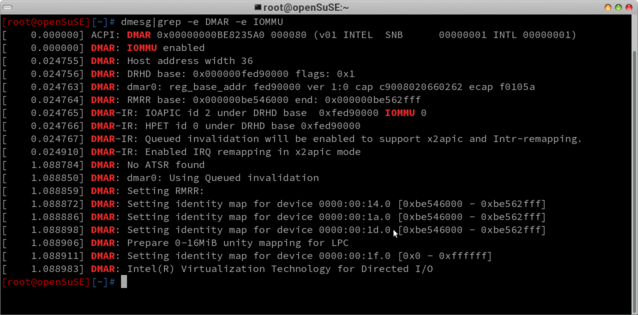
dmesg|grep -e DMAR -e IOMMU
to verify that IOMMU is enabled properly.
- dmesg iommu output
If you have a similar output, IOMMU is enabled.
3. Make sure that IOMMU groups are valid
Run this script (I’ve named it lsiommu):
#!/bin/bash
shopt -s nullglob
for d in /sys/kernel/iommu_groups/*/devices/*; do
n=${d#*/iommu_groups/*}; n=${n%%/*}
printf ‘IOMMU Group %s ‘ “$n”
lspci -nns “${d##*/}”
done;
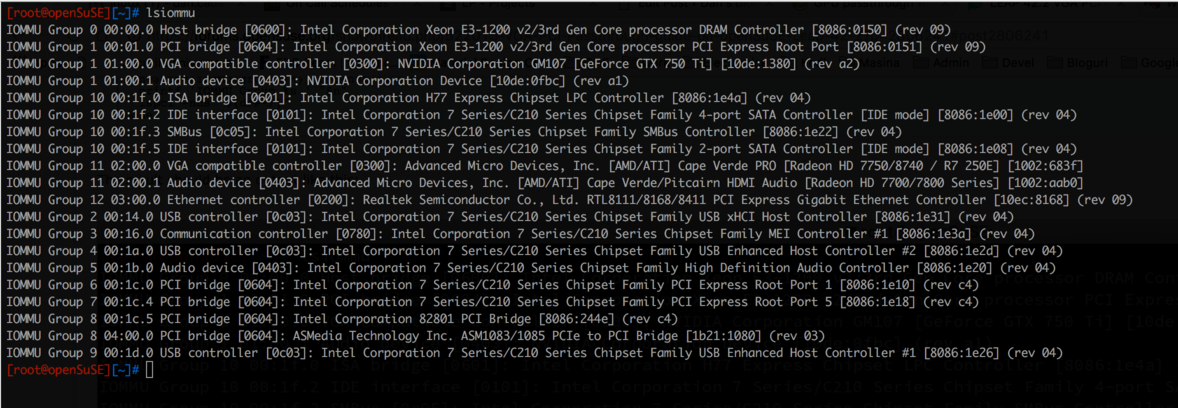
The result should be an output like this:
- iommu groups
Here you can find 2 things: what IOMMU group the device you want to use for the virtual machine is (in my case, group 11) and its vendor/model ids (in my case, 1002:683f and 1002:aab0). This guide will work only for devices which are alone (ignoring their associated audio device) in their IOMMU group.
4. GPU isolation
We need to isolate the GPU. This is pretty easy if you have 2 GPUs from different manufacturers (like me – just blacklist the module for the GPU you want to use in VM), but a bit more complicated if both GPUs are from the same vendor. And a lot more complicated if both GPUs are the same model. This guide can be followed as long as both your GPUs are NOT the exact same model, even if they are from the same vendor. It will NOT work with 2 identical GPUs.
First, create a file named /etc/modprobe.d/gpu-passthrough.conf. Edit it and insert:
options vfio-pci ids=_your_GPU_ids_[,your GPU’s audio device id]
in my case, that was:
options vfio-pci ids=1002:683f,1002:aab0
Please note the ids.
5. Rebuild initrd
You need to rebuild the initial ram disk to include all the needed modules. Create a file named /etc/dracut.conf.d/gpu-passthrough.conf and insert this line into it:
add_drivers+=” pci_stub vfio vfio_iommu_type1 vfio_pci vfio_virqfd kvm kvm_intel “
(Note the leading and trailing spaces)
Rebuild now the initrd by executing
dracut -f /boot/initrd $(uname -r)
Please pay attention, because if you did something wrong, this might make your Linux unbootable.
6. Reboot and check that your GPU was isolated
After you’ve rebuild you initrd, check if your GPU was isolated; run lspci -k and look for Kernel driver in use: for the GPU that you want to isolate (use with the VM). It should state vfio-pci. Example:
02:00.0 VGA compatible controller: Advanced Micro Devices, Inc. [AMD/ATI] Cape Verde PRO [Radeon HD 7750/8740 / R7 250E]
Subsystem: PC Partner Limited / Sapphire Technology Device a001
Kernel driver in use: vfio-pci
Kernel modules: radeon
02:00.1 Audio device: Advanced Micro Devices, Inc. [AMD/ATI] Cape Verde/Pitcairn HDMI Audio [Radeon HD 7700/7800 Series]
Subsystem: PC Partner Limited / Sapphire Technology Device aab0
Kernel driver in use: vfio-pci
Kernel modules: snd_hda_intel
That means that your GPU is isolated from the host OS.
7. Define a VM
First, open /etc/libvirt/qemu.conf, find the nvram option and edit it like this:
nvram = [
“/usr/share/qemu/ovmf-x86_64.bin:/usr/share/qemu/ovmf-x86_64-code.bin”
]
Restart libvirt daemon:
systemctl restart libvirtd
Start Virtual Machine Manager and create a new machine.
Select “Local install media” and “x86_64” for architecture options:
- Define a new VM
Select the Windows installer ISO image:
- Select installer ISO image
Chose how much memory and how many CPU cores your VM will have:
- Set memory size
Create (or select one if you already have one defined) a disk image for your VM (it can even be a whole disk – just put its path there and make sure it’s not mounted in the host):
- Setup storage
Name your VM, make sure you’ve checked “Customize configuration before install” and click on Finish:
- VM summary
You’ll be taken now to VM configuration screen. On Overview page, select UEFI firmware and i440FX chipset (q35 did not work for me):
- Overview
On Processor page set “host-passthrough” for your processor (if it’s not in the list, just type it):
- Set CPU settings
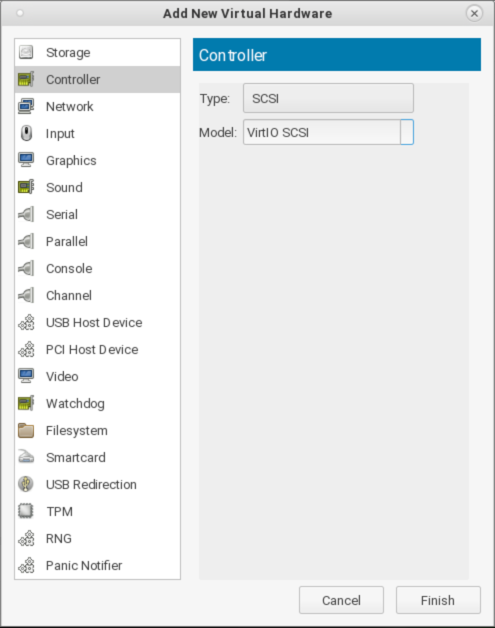
Click on “Add Hardware” button and add a SCSI controller (make sure to change the type to VirtIO SCSI for improved performance):
- Add a scsi controller
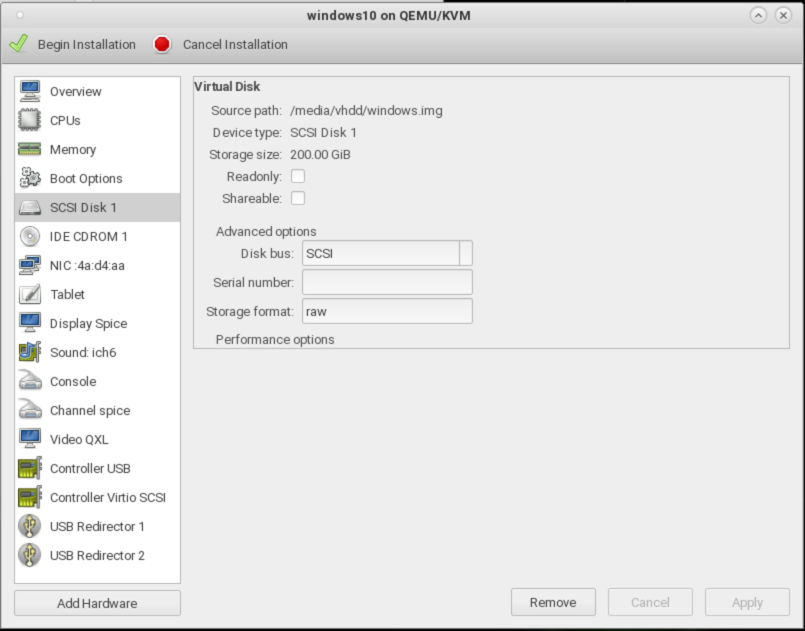
You’ll have a IDE disk by default. Change that to SCSI:
- Setup SCSI disk
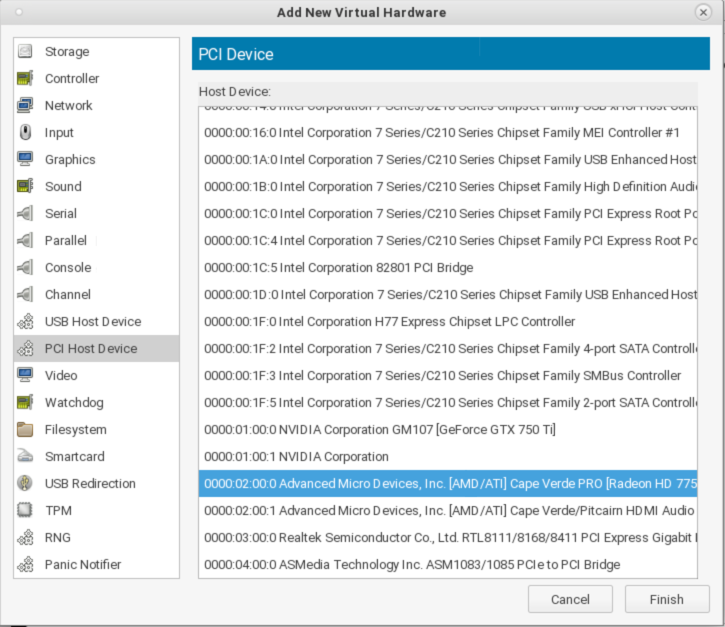
Add your isolated GPU – if it has a sound device, like mine, and if you have sound output (via HDMI or Display Port) on your display, add the soundcard (in my case, PCI device 02:00.1) as well:
- Add PCI devices
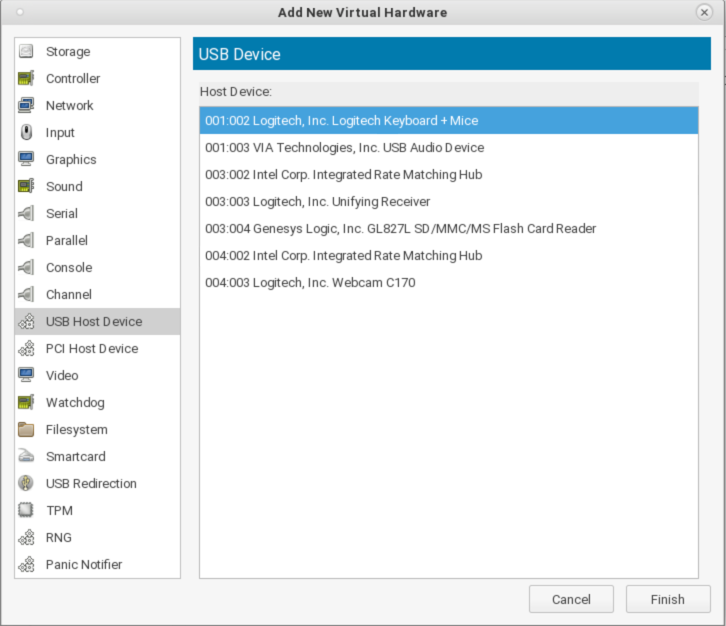
Add a keyboard and a mouse – would be better if you have an extra pair as the input will be grabbed by the VM once it starts:
- Add keyboard and mouse
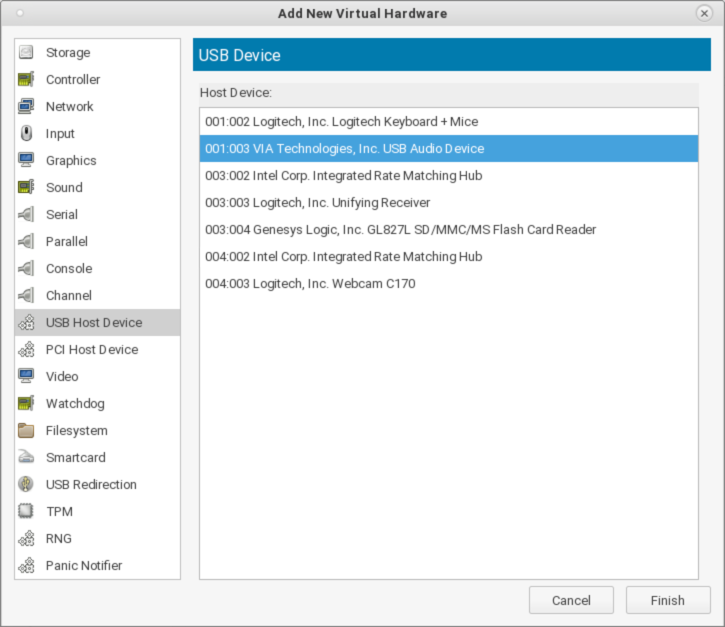
Remove all unnecessary devices – Tablet, Display Spice, Console, Channel spice, Video QXL. You’ll need a soundcard if your display does not have sound output or if you’ll connect it via VGA. You can buy a cheap USB sound card – you can find one of those for 10$ – and add it like you’ve added the keyboard and the mouse:
- Add a USB soundcard
Connect your the video card that you’ve just assigned to the VM to a display and click on “Begin Installation”. If you did everything right, you should see the VM booting on that display.
8. Install Windows. You’ll need the VirtIO drivers downloaded at step 2 for the HDD (can be found under vioscsi directory).
9. After Windows is installed, you can install Synergy which is really amazing – with it you can use the same keyboard and mouse on multiple PCs without a physical KVM (Keyboard-Video-Mouse) switch.
Result: 3D Mark score



I had to append rd.driver.pre=vfio-pci to GRUB_CMDLINE_LINUX_DEFAULT to get vfio-pci to bind to the device. Thanks for the article!
I just see this when running the lsiommu script:
‘IOMMUlspci: -s: Invalid domain number
‘IOMMUlspci: -s: Invalid domain number
‘IOMMUlspci: -s: Invalid domain number
‘IOMMUlspci: -s: Invalid domain number
‘IOMMUlspci: -s: Invalid domain number
‘IOMMUlspci: -s: Invalid domain number
‘IOMMUlspci: -s: Invalid domain number
‘IOMMUlspci: -s: Invalid domain number
‘IOMMUlspci: -s: Invalid domain number
‘IOMMUlspci: -s: Invalid domain number
‘IOMMUlspci: -s: Invalid domain number
‘IOMMUlspci: -s: Invalid domain number
‘IOMMUlspci: -s: Invalid domain number
‘IOMMUlspci: -s: Invalid domain number
‘IOMMUlspci: -s: Invalid domain number
‘IOMMUlspci: -s: Invalid domain number
‘IOMMUlspci: -s: Invalid domain number